
Tightening your snowboard bindings properly is important to ensure that you have proper board control during your session. If you’re a newcomer to snowboarding than you may be wondering how tight your bindings need to be.
Your bindings should be sufficiently tight to prevent excess movement of your foot while carving down the mountain. With traditional strap bindings, tighten both the ankle strap and toe strap as tight as you can without compromising circulation to your feet. With rear entry bindings, you want them to fit just as snug as traditional strap bindings.
This article will completely cover how tight your bindings should be and how to tighten them. We’ll also go over the two different types of snowboard bindings and about the different amounts of flex found in different bindings, and what they are suited for.
Table of Contents
Snowboard Binding Tightness
There are two straps on most snowboard bindings to tighten, and these are the toe strap and the ankle strap. When you step into your binding you’ll want to tighten both of these straps to the point where your foot does not move around in your boot. You should avoid cutting off circulation to your foot. If you feel any numbness or tingling you will need to loosen the bindings some.
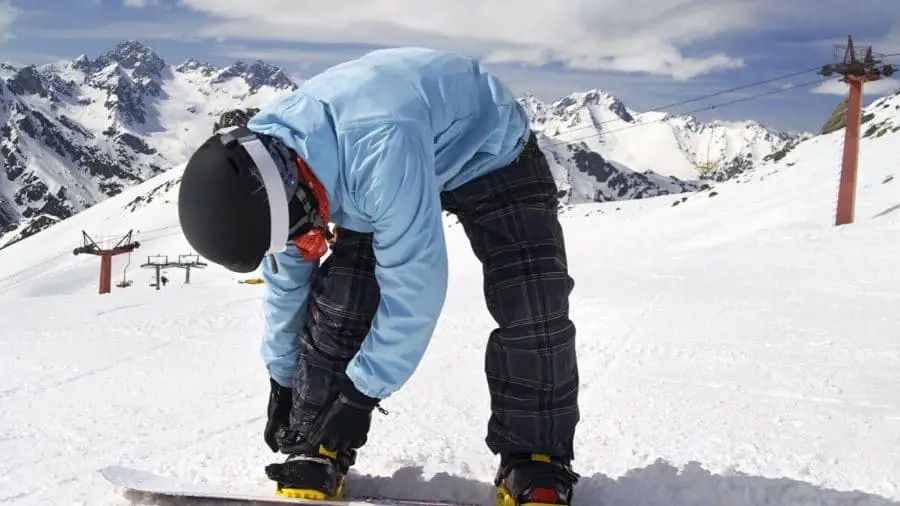
The first thing you do when you step into your binding is to get your heel all the way back near the high-back. You need to make sure that there is no snow built up anywhere between your boot, and the binding. Then ratchet down the toe strap, and ankle strap as tightly as is comfortable. Having a well-tightened binding gives you more board control and more response from your binding.
There are two different types of bindings. The traditional strap binding provides excellent support and cushioning, and is preferred by most riders. There are multiple adjustment options on this type of binding. They have a toe-strap, and an ankle strap that you tighten separately.
There are also rear entry bindings with reclining high-backs. The high-back lowers down, and you step right into them. Then raise the high-back up to its original position. These are preferred by casual riders as they are easier to put on. However, they offer reduced board control.
Different bindings have different amounts of flex. The amount of flex they have should match the amount of flex in your boots. You should choose the amount of flex you have in your bindings based on your skill level. Beginners should choose medium to soft flex. Freestyle riders also prefer softer flex. All-mountain riders will do better with a medium to stiff flex in their binding.
How to Tighten Your Snowboard Bindings
For the traditional strap-in bindings you’ll want to step into your binding with your front foot. Then, you’ll need to make sure there is as little snow as possible in the binding itself. It’s best if the boot fits flush with the binding to get them as tight as you can.
First, ratchet the ankle strap to get to the heel as far back as possible. You want the heel of your boot as close to the back of the binding as you can get it. Then fasten the toe strap. This should be as tight as possible, but not so tight that you feel uncomfortable.
You don’t want to feel any numbness, or tingling as this would be a sign that you are compromising circulation, or crushing nerves. Try to wiggle your feet, and if you cannot then you have tightened your bindings sufficiently. Your foot should not feel loose in any way.
If you are using rear entry bindings, there will either be one non-adjustable strap, or two straps. Either way they will have already been properly tightened by you, or the factory. If there are two straps, you’ll tighten them before getting out on the mountain, following the same procedure outlined above.
To get into rear entry bindings, you’ll recline the high-back, and step into the binding. You will then raise the high-back back up to meet your the achilles heel area, and back of your boot. Latch the high-back firmly in place, and your’e ready to go down.
What are the Different Types of Snowboard Bindings?
There are two types of snowboard bindings. These are the traditional strap bindings, and the speed-entry, or flow bindings.
Traditional strap bindings have two straps that ratchet down to fix your boot onto your board. There is a toe strap, and an ankle strap. The majority of snowboard riders choose to use these traditional ratchet bindings.
Traditional strap bindings give you better, and more accurate board control. They are lighter, and make it easier to get snow off your base plate. They are quick to adjust. The only negative to this binding is that they can take a little longer to put back on before your run.
The other type of binding is the rear entry, or flow binding. These bindings have a reclining high- back that allows you to step right into your binding. You don’t have to sit down to put them on.
They generally have one large strap that fits over your foot. However, some models still have a separate toe strap and ankle strap. One benefit of the mono strap is that it will distribute pressure more evenly across the top of your foot.
There are some cons to using rear entry bindings. They are generally heavier, and less easy to adjust on the go. You’ll need some tools at home to adjust the tightness of the straps. They also tend to be heavier, and less responsive than traditional strap-in bindings.
You will have a difficult time getting them on in deep powder. You also won’t be able to rotate the high-backs or adjust the forward lean. For these reasons more advanced riders typically choose standard strap on bindings, and casual riders may prefer rear entry systems.
What is Binding Flex?
Another way bindings differ is in the amount of flex they have. The difference in flex is in the high-back. You will see a flex rating between 1 and 10, labeled on your bindings, or binding box. 1 being the softest, and 10 being the stiffest. The manufacturer may indicate flex by using words such as soft, medium-soft, medium, medium-stiff, or stiff.
Your skill level, riding style, and the type of riding you like to do will dictate whether you should have soft, medium, or stiff flex in your binding. Beginners should choose softer flex as they are more forgiving. You will be less likely to fall from digging a rail with soft to medium-soft bindings. Recommended flex for a beginner is medium-soft, or 3-4 out of 10.
Freestyle riders should choose softer flex. If you’re only riding in the park a soft, or 1 to 2 rating is good. The reason for this is that it allows for easier landings and a large room for error. You will also be able to perform grabs easier.
Freestyle riders who also like to ride other areas of the mountain should have a little more stiffness in their binding. A medium-soft flex or 3 or 4 out of 10 is good.
For larger jumps, or riding the halfpipe riders should go with an even stiffer flex. A medium flex, 5 to 6 out of 10 is recommended. You still want some forgiveness to do grabs, but the added stiffness will help your landings be more stable.
Typical all-mountain riders enjoy park, trails, and backcountry. A flex rating of 5 to 8 out of 10, or medium to medium-stiff flex is a good choice. If you’re spending more time bombing hills at high speeds and carving up the backcountry you’ll want to go on the stiffer side to a 7 or 8 out of 10, or medium-stiff.
If you’re a very advanced, aggressive backcountry powder lover you’ll want a super responsive, stiff binding. You should look for medium-stiff to stiff flex, or somewhere between a rating of 7 to 9 out of 10.
Whichever type of binding, and flex you choose make sure to tighten appropriately for the best results and the most fun.