

Backcountry snowboarding. The real reason many of us started to board. The freedom of being in nature with no one else dictating which line you are going to take. It’s the ultimate form of snowboarding and can be started earlier than people think.
The number one thing to take into consideration when backcountry snowboarding is safety. Without safety, unnecessary risks arise and a good weekend can become tragic without warning. But, when done safely and smartly, it can be the best weekend you’ve ever had.
This Beginner’s Guide to Backcountry Snowboarding will cover:
- Gear to take with you
- Different types of safety gear
- Never go alone
- Tell someone where you’re going
- Choose the right hill
- Choose a line to your ability
- Lift access backcountry snowboarding
- Avalanche safety
- First aid
- Ways to build a backcountry jump
- Cliffs and backcountry snowboarding
- Reasons to go backcountry snowboarding
Table of Contents
Backcountry Snowboarding Gear
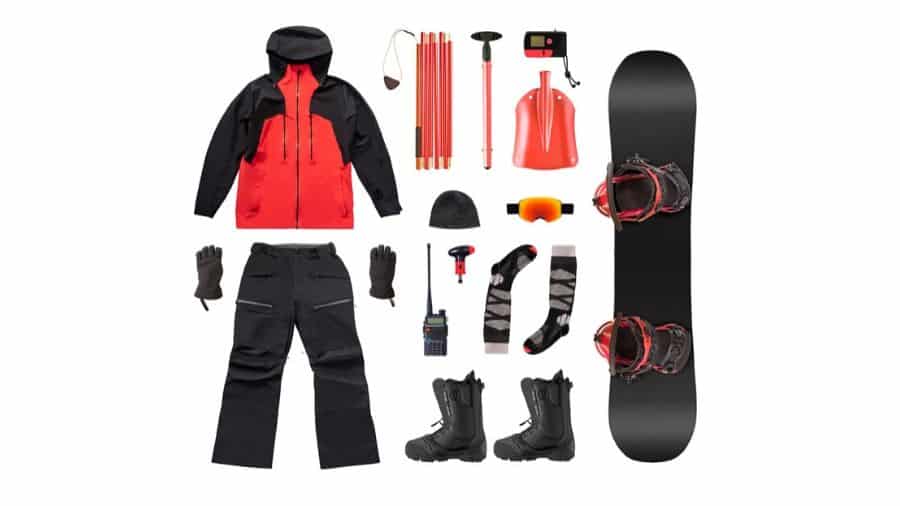
The gear you take with you is definitely going to be different than when you just shred on a hill. Here’s a list. I’ll go through the differences between the gear later on and the ins and outs of choosing what’s right for you.
- Splitboard
- Climbing skins
- Helmet
- Goggles
- Ski poles
- Avalanche Transponder
- Recco Enabled Gear
- Snow Study Kit
- Pack (with an avalung or not, up to you)
- Compass
- Map
- Water
- Sunscreen
- Flashlight
- Reflective Blanket
- Duct tape
- Knife
- Snowshoes
- Shovel
- Ice Axe
- First Aid Kit
- Handwarmer/footwarmer packets
- Matches/lighter
- Waterproof container
- Fire starter
Most of this gear is mountain survival gear and there’s a reason for that. Preparing for the worst means that, when something terrible happens, you’re ready.
Verse yourself if your gear before you go. There’s no point buying the fancy avalanche transponder for everyone in your group if, when an avalanche strikes and half your crew is missing, you can’t turn it on.
Know How to Start a Fire
Be able to start a fire in the snow. Practice before you go USING THE GEAR YOU’RE BRINGING. Guys, I know it seems like common sense, but you’d be astounded at how many people will hike for a full day to get the line, fall, get injured, and can’t start a fire. Then you’re freezing as your friends get help. This is an excellent way to lose a hand or a foot. You want a good story and some great pictures, not have to explain why you only have eight fingers.
Be Prepared
Pack like you’re spending the night on the mountain. Pack some extra rations and a lot of water. Pack some water purifying tablets in case it all goes south and you’re left on the side of the mountain overnight.
Make sure you have toilet paper for when the five rum and cokes from the night before hit you all at once and you have to go to the trees. Can you find leaves to wipe with in the winter? Because I sure can’t. Pack some hand sanitizer. Giving your entire crew beaver fever or dysentery is really bad form.
Splitboards and Skins
Splitboards and skins. They are a pretty cool invention that makes your board double as a set of snowshoes. The board splits in half and you attach some grippy skins to the bottom. Then you can use some ski poles and climb to the top of your line. They aren’t cheap, you need split board bindings and the skins, but if you plan on backcountry boarding a lot they are a decent investment.
You can do the snowshoe thing, and there’s plenty of packs that let you strap your board across your back. You can also take a helicopter to the top or use a snowmobile. It’s up to you and the resources that you have available. I don’t have the money for a helicopter but know a couple people with sleds. It depends on your situation.
RECCO Enabled Backcountry Snowboard Gear
RECCO is a reflector that is instrumental in getting found fast in an avalanche. Many big brands (from Arc’Teryx to Helly Hansen) have RECCO reflectors built right in, so you don’t need to worry about it.
Look for the RECCO brand patch on your gear. You might already have it without knowing it. It can be on your boots, bindings, pack, coat, skipants, helmet. Really everything you can think of may have a RECCO reflector built-in. If you’ve seen it before and didn’t know what it was, now you do.
How does it work? The reflector sewed into your gear doesn’t need a battery and doesn’t have to be turned on. When an avalanche occurs, rescuers take a RECCO detector that sends out a signal (like a flashlight).
If somebody with a RECCO reflector is buried, the detector picks it up like a radar. The closer the rescuer gets, the stronger the signal, meaning that trained rescuers can find victims efficiently. They can even hang a detector underneath a search and rescue helicopter, which is really cool technology.
Avalanche Transceivers and Backcountry Snowboarding
An avalanche transceiver is a piece of equipment that works as both a transmitter and receiver in one unit. When you start your run, you set your transceiver to transmitting, which will send out a low signal. If an avalanche occurs, everyone with a transceiver sets it to receive mode, which allows them to track the buried boarder.
They may be expensive, but they are worth it. Surviving an avalanche depends on being found within the first thirty minutes after being buried. After that, survival rate decreases exponentially.
Using an avalanche transceiver and poles is a requirement for backcountry boarding in the mountains, not something that is useful if you can afford it. It is essential. All of them have the option to transmit and receive, and they all operate at 457kHz which is the industry standard. This means that different brands and different years work together. All of the time.
Get your gear. Get the good stuff. You or your buddies’ life may depend on it. I highly recommend the Backcountry Access Tracker 3, its ultra-lightweight, comes with a harness and has a solid battery life.

Basic Backcountry Snowboarding Survival Skills
Many of this might seem like common sense, but some people don’t have any of that. So, here’s a list on some survival skills that will help in the worst-case scenario.
- Never go alone
- Always tell someone where you’re going
- Leave a map with a CLEARLY MARKED area where you will be exploring under the front driver’s seat of your car (rescuers look for this when an avalanche occurs) as well as the date you plan to go
- Know how to read a map (a paper map, people. If you can only go with your phone and you drop it in the snow, you can’t get back to your car)
- Satellite phones are a great thing
- Keep matches and firestarter in a waterproof container. If you break a leg and stop moving for three hours (the time it takes to get someone in deep backcountry and get you and your busted self out of the bush)
- Buy a reflective blanket. They let you hunker down and keep warm, plus search and rescue are trained to look for the reflection
- Water
- Food
- Extra water and extra food
- Handwarmer/footwarmer packets for if you have to stop moving
- Dress for the weather
- Wear clothes that can be WARM when WET. Wool is great, polyester is garbage. Dress in layers and make sure that you can get your stuff wet and still be warm
- You can build a quinzhee with a shovel and some time. Practice at home first (they make for a great beer den in the winter in your back yard). They’re easy shelters made from piling loose snow then hollowing out a cavern. Use a pack as a door, and your body heat will warm up the quinzhee making it lined with a bit of ice. Works wonders for a shelter
- Bring toilet paper
- Bring hand sanitizer
- Bring lady products if you need them
- Have fun and be safe
Picking the Best Backcountry Spot to Snowboard
First thing first. Do NOT go into an area that has a history of avalanches unless you are a trained professional. You need to know what you’re doing in these places. Unless you’re with a guide, don’t do it. An avalanche can occur on a slope between 30 and 45 degrees. There will be a history of avalanches in the area.
Read the reports. Go back for a few months. Do your research. Don’t go in an area that has been labeled as an avalanche risk, especially if you’re a newcomer to backcountry. Or go with someone who knows what they’re doing.
Be aware of your actual snowboarding ability. Don’t go on a mountain that you do not have the skills to get back down on a board. Or else I guess you’re hiking a whole bunch more than you originally intended. Nothing is worse than hiking all day for a line to realize that the cliff that you thought was five feet is twenty. It makes for a long and embarrassing walk downhill.
Practice picking lines doing tree runs on the mountain. They make you really think, especially if you’re in the middle of the run and you can’t figure out a way out.
Tree runs are terrific practice for picking doable lines. When going up the chairlift, spot your line. Try to hit exactly where you spotted on the way down. It’s harder than you think, and it’s a skill that needs to be practiced pre backcountry trip.
Backcountry Snowboarding and Powder
If you have a big backcountry trip coming up and you want to practice so you’re not left behind, I highly suggest practicing your powder skills.
No, boarding in powder is not the same as boarding a groomed run. You have to lean back farther to keep your tip-up, or you’ll get buried.
The same goes for landing tricks in powder. It is not the same as landing tricks off of a groomed run. Your rotation will be different off of a cliff, your landing will be different into powder. Your line choice and how much you have to pre rotate on an approach is different. It’s all different. So now’s the time to start practicing.
Even if you don’t have a place to board powder, practice your tree runs. Practice choosing lines. This is important. If you get halfway through a pre-chosen line and panic, it might go south really quick. Pick a line, commit, and don’t talk yourself out of it.
Lift Accessed Backcountry Snowboarding
A solid way to middle ground to true backcountry snowboarding is to go to a lift access backcountry snowboarding area. These are well-signed areas on the mountain that, with maybe some hiking, you can pick an ungroomed line. It’s a good way to test your skills without having to plan a big trip. Plus the ski lift will bring you back to the top of the mountain so that you can do it all again.
You may have to prove that you’re with a buddy, that you have a shovel and probe and that you have an avalanche transceiver to get to this part of the hill. Like I said above, these are the bare necessity basics to backcountry boarding.
Lift accessed backcountry snowboarding is a really good way to test your skills against the mountain in a relatively safe environment. Fair warning, this does not mean that you’re out of avalanche territory.
An avalanche can occur in one of these areas, so keep your head on a swivel and be prepared. Don’t be stupid, research snow conditions, and if there’s an avalanche warning in the area, DON’T GO INTO IT. Not only will you kill yourself and your friends with your idiotic bravado, you have no idea how far an avalanche can go. Maybe it hits that highway that you drove up to get to the spot.
You don’t want people reading the paper to call you an idiot at their dinner table. You want to have another dinner with your family. You DO NOT know more than those people who make the avalanche reports.
Avalanche Safety and Backcountry Snowboarding
I highly suggest that you take an avalanche safety course before attempting any type of backcountry snowboarding, including lift accessed backcountry.
An avalanche is a snow slide that is caused by heavier snow at the top of the pack pushing through lighter snow underneath. It can be caused by a human or a loud noise, or the angle of the hill itself.
An avalanche is absolutely a life threat, with most people dying who encounter one.
Trauma is the number one cause of death when caught in an avalanche, with most people being hit by rocks or debris or being sent over a cliff. If you’re lucky enough to survive the initial impact, then you have approximately fifteen to thirty minutes before your air runs out and you asphyxiate.
A piece of gear, called an Avalung (manufacturers website), can push this to almost an hour when used properly. This pack has a long tube with a bi-valve that puts the CO2 breathed out closer to the victims hip and pulls air out of the snowpack around you. The mouthpiece and tubing can be stowed away in a zippered compartment when not in use. Look for backpacks that are Avalung compatible.
The fanciest pole, shovel and transceiver setup does nothing if you can’t use it. And I mean really use it.
It’s one thing to play around with it in your basement, it’s another thing entirely to use it in a high-stress situation. An avalanche safety course will teach you how to read snow, how to safely choose a spot to board, and how to properly use your gear… before you’re panicked and have someone relying on you.
First Aid and Backcountry Snowboarding
So, how good are you at making a splint out of a couple branches and some duct tape? That’s an essential skill when doing anything in the backcountry, and I highly suggest a mountaineering or wilderness first aid course for more than one person in your group.
If your one buddy is trained and he’s the one whose kneecap is facing the wrong way, he’s not going to be particularly helpful. He’s probably screaming at you in pain, and knocking him out is poor form.
Have more than one of you take the course. It’s fun to go with a friend, and it will be better for everyone in the long run.
The main part of first aid is ingenuity. You don’t have to pack splints in with you. Duct tape and branches work well. Wrap a cut thumb in a sock. Putting something that’s bleeding in snow will help slow the bleeding down (the snow constricts the blood vessels). A wilderness survival course will teach you ways to work first aid in the backcountry.
A satellite phone and the number for the backcountry search and rescue in your area is an absolute must. Again, more than one satellite phone if you can afford it.
You need to be able to call for help. A cell phone is hit and miss for reception. A satellite phone is way more likely to get service when you really need it to.
Backcountry Snowboarding Jumps
We’ve all seen the videos online. The snowboarding videos of the first hit of a massive kicker set in the backcountry. The riskiest, most dramatic and most fun jumps come from building them yourself in the backcountry. That first hit can be triumph or failure, and it gets your heart pumping standing at the top of your run. Especially if you’re the guinea pig.
When building a backcountry jump, make sure that you’re not going to land on a flat.
That’s the best way to put your buddy’s new first aid skills to use. And for you to never snowboard again due to shattered knees that hurt worse than your destroyed ego.
So, if you’re building, build them smart. If you’re new to backcountry, start small then get bigger as you get used to the process. Maybe let your buddy take that first hit on your first backcountry kicker. This is also a good reason to pack shovels. Yeah, they’re good if you’re stranded, but you might as well put them to use if all is going well.
Watch your takeoff in powder. Catching an edge when trying to get some spin can really mess up your jump, especially if you need the spin to steady yourself off of an uneven takeoff. You may need to start your rotation a little earlier than you would in the groomed trick park. Or you might need to twist a little harder to get all the way around in powder.
Backcountry Snowboarding and Cliffs
If you’re like me and hate building jumps, then cliffs may be the right answer. This can be a dangerous game, as you really don’t know the depth of the snow you’re landing in until you land.
Some pretty serious injuries can occur if you don’t do your proper homework on the area you’re boarding in.
A quick look at pictures from the line you’re looking at in the summer will tell you if there are giant boulders at the bottom of the cliff. It will also help you decide whether or not a line is worth it or even doable, as a quick comparison in pictures from the summer and the winter can tell you roughly how much snow is in your landing.
When in doubt, check it out first.
Unless you’re taking a chopper in then you should be walking by or near the line you’re planning on taking on your way up. Don’t be shy to use your avalanche pole and check it out pre-drop in. You’ll be more confident hitting the cliff, and that confidence will show in your boarding.
Backcountry Snowboarding and Confidence
If you don’t want to be on the mountain and are scared, the mountain will eat you alive. That’s the truth backcountry, sidecountry, frontcountry, any country.
Respect the mountain, but have confidence that you can and will hit that line you’ve been planning during that entire four-hour snowshoe hike to the top. If your confidence wavers, try and build it doing something you know you can do.
The Reasons to Take a Risk and Backcountry Snowboard

There’s a ton of reasons to go backcountry snowboarding. And they’re all pretty amazing.
Bring your camera, the views you’re going to get are spectacular. With nobody else where you are, the mountains will speak to you. You’ll breathe air that is the cleanest you’ve ever breathed. You’re going to sweat and work hard for the line, so when you finally get to ride it, the exhilaration you feel while carving your line is unparalleled.
There’s going to be blood, sweat and tears. And trust me, they’re all so worth it. If you don’t have a go-pro (Amazon link), now is the time to get one. This won’t be your average snowboarding video. It’s going to be amazing and the lines you take may be the only ones like that on the mountain.
Are you hearing what I’m saying? You could be the first and last person to ever take that specific line. The snow conditions will never be the exact same. Nor will the weather. This line is yours and will be yours forever. That’s something to cherish and something that you can’t get in between the trees of a groomed run.
When powder hits your face, the cool mountain air at your back, the beauty of the untouched mountains in your vision… it’s one of the most beautiful sights and experiences in the world. And with a little training, a lot of heart and a drive to get the line, you can have that experience for yourself.